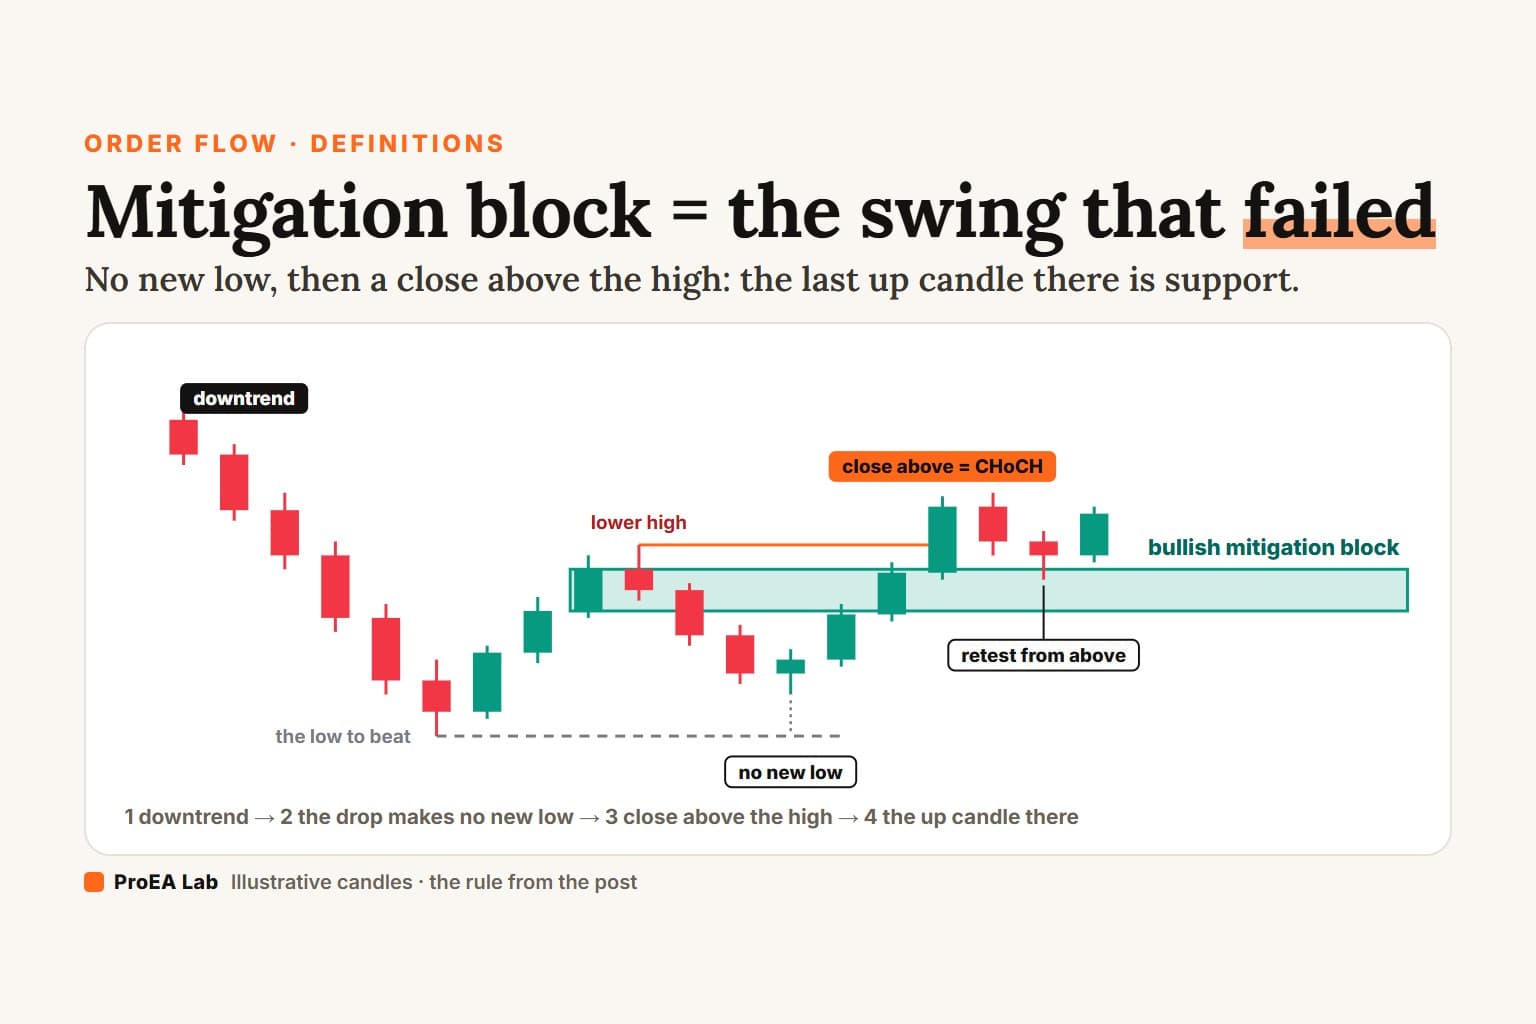
A mitigation block is the candle where a failed swing started. In a downtrend, a drop from a lower high doesn't close below the last low: no new low. When a candle then closes above that high, a CHoCH, the last up candle at the high is a bullish mitigation block, watched as support from above. A bearish one mirrors it: an uptrend, a rally that makes no new high, then a close below the higher low.
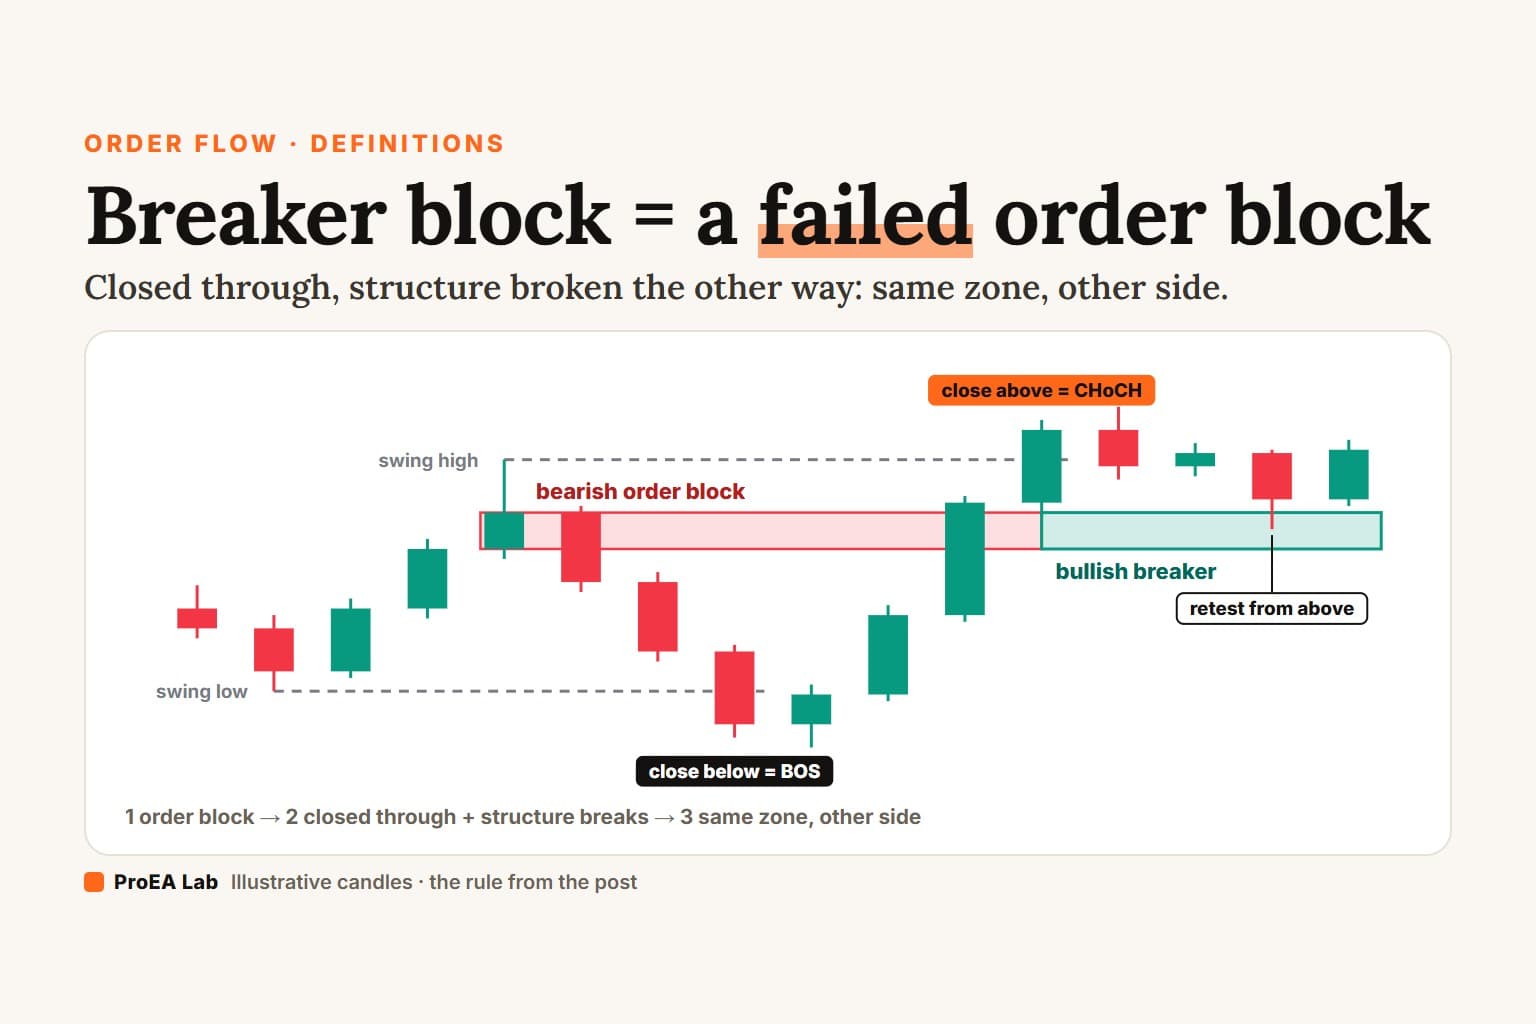
Closes, not wicks. And the move before the break picks the name: with a new low it's a breaker block, without one it's a mitigation block.
Every chart below is a replay of simulated candles, read by one written rule. It builds on BOS vs CHoCH, the order block and the breaker block.
What is a mitigation block?
Mark two lines first: the last low (the low to beat) and the lower high after it (the high to break). The drop from the high has to stay above the first, by close. Then a candle closes above the second. From that close, the body of the last up candle at or before the high is the zone.
Simulated 15-minute candles, not market data. Swings are confirmed by 3 candles on each side. No ProEA indicator draws mitigation blocks; the block marks are this article's rule.
Read as text
- Structure is down: a candle closes below a swing low at 71.50. The last swing low, 70.68, is the low to beat.
- A lower high forms at 71.22. The last up candle at or before it, 70.99 to 71.14 (body), is the block's candle.
- The drop from the high turns at 70.99, without a close below 70.68: no new low. Nothing broke on the way, so no order block formed there.
- A candle closes above the high at 71.22: a CHoCH. From that close the up candle's zone is a bullish mitigation block, watched as support from above.
- 4 candles later price trades back into it from above: its first retest. The film stops there; what can happen next is the last film's subject.
How this window was chosen: The first 15-minute window of the simulated market with a bullish mitigation block: structure is down (the last close beyond a swing came before the high formed, and it was below a swing low); a lower high forms at least 4 candles after the swing low before it, with no trade below that low in between (not even a wick); the drop from the high never closes below that low; a close above the high, a CHoCH, comes within 12 candles of the drop's low; and the last up candle at or before the high has a visible body. The drop also stays at least one average candle above the low (not even a wick), and price first trades back into the zone from above 3 to 12 candles after the CHoCH, without closing below it on that candle. The film ends on that retest; the last film shows what can come next.
Use itMark the low to beat and the high to break before the turn. No close below the first, then a close above the second.
Watch outIn an uptrend, a higher low and then a break of the high is a plain BOS. A mitigation block needs the trend to turn: the break must be a CHoCH.
Mitigation block vs breaker block
Same candle at the high, same close above it. One question tells them apart: did a candle of the drop close below the low?
Simulated 15-minute candles, not market data. Swings are confirmed by 3 candles on each side; order blocks follow SMC Basics' rule. No ProEA indicator draws breakers; the breaker marks are this article's rule. Both blocks are drawn from the last up candle at or before the swing high.
Read as text
- A swing low at 74.38, then a swing high at 75.21. The last up candle at or before the high is the candle both blocks are drawn from: 75.01 to 75.17 (body).
- The drop from the high closes below 74.38: a new low and a BOS. By the order-block rule, that same up candle is now a bearish order block.
- A candle closes above the high at 75.21: a CHoCH.
- The order block failed after taking the low: the up candle's zone is a bullish breaker.
How this window was chosen: The first window in which a drop from a swing high closes below the swing low before that high (a new low), the order block of that close is the last up candle at or before the high and has a visible body, and a later close above the high comes within 12 candles of the drop's low. Windows are picked one after another, each starting after the last one picked, so no two films share candles.
Use itBefore you name the zone, scroll back to the drop and ask one thing: did a candle close below the low?
Watch outBoth names can sit on the same up candle, so the zone alone won't tell you which one you're looking at.
| Mitigation block | Breaker block | |
|---|---|---|
| The drop before the break | holds: no close below the low | closes below the low, a new low |
| An order block on the way down? | no, nothing broke | yes, the new low made one |
| The zone | the last up candle at the high | that order block, closed through |
| Made by | a close above the high (a CHoCH) | a close through the zone, plus a break up |
| Then watched as | support from above | support from above |
| Ends on | a close below its bottom | a close below its bottom |
The breaker page plays the same comparison; its breaker block section has the rest of that story.
Does a wick below the low count?
Not here. A wick below the low that closes back is a liquidity sweep, not a new low, so the block stays a mitigation block. Read by wicks, the same sweep is a new low, and the same zone is a breaker. That's the biggest split between the definitions online.
Simulated 15-minute candles, not market data. Swings are confirmed by 3 candles on each side. No ProEA indicator draws mitigation blocks; the block marks are this article's rule. Swing labels (HH, LL) read wicks, as on most charts; the block's rule reads closes. The wick tab shows how wick-based tools name the same zone.
Read as text
- Structure is down. The last swing low, 164.94, is the low to beat; a lower high forms at 165.19. The last up candle at or before it is 165.00 to 165.17 (body).
- The drop from the high wicks to 164.87, below 164.94, and every candle closes back above it: a sweep of the low.
- A candle closes above the high at 165.19: a CHoCH.
- Read by closes, as this page does, the drop never made a new low, so the up candle's zone is a bullish mitigation block.
How this window was chosen: The first window with a bullish mitigation block (structure is down (the last close beyond a swing came before the high formed, and it was below a swing low); a lower high forms at least 4 candles after the swing low before it, with no trade below that low in between (not even a wick); the drop from the high never closes below that low; a close above the high, a CHoCH, comes within 12 candles of the drop's low; and the last up candle at or before the high has a visible body) whose drop wicks at least a quarter of an average candle below the low. The film ends 1 candle after the CHoCH. Windows are picked one after another, each starting after the last one picked, and never on the breaker-block article's candles, so no two films share candles.
Use itDecide close or wick before you look, and write it down.
Watch outSwitch between them and every zone gets whichever name fits the trade you wanted.
What happens when price comes back?
The first retest is the first candle back into the zone from above. It can hold, or a candle can close below the zone, and then the block is gone. The film shows both; neither is a result.
Simulated 15-minute candles, not market data. Swings are confirmed by 3 candles on each side. No ProEA indicator draws mitigation blocks; the block marks are this article's rule. Both outcomes are shown; neither is a result.
Read as text
- In a downtrend, the drop from a lower high at 173.80 turns at 173.40, above the low at 173.30. A close above the high (a CHoCH) makes the last up candle's zone, 173.53 to 173.74, a bullish mitigation block.
- 3 candles later price trades back into the zone from above: its first retest.
- That candle closes back above the zone, and no candle closes below the zone for the rest of the film, 8 more candles.
How this window was chosen: The first window with a bullish mitigation block (structure is down (the last close beyond a swing came before the high formed, and it was below a swing low); a lower high forms at least 4 candles after the swing low before it, with no trade below that low in between (not even a wick); the drop from the high never closes below that low; a close above the high, a CHoCH, comes within 12 candles of the drop's low; and the last up candle at or before the high has a visible body) that is first retested 3 to 12 candles after the CHoCH, where that candle closes back above the zone and no candle closes below the zone for the next 8 candles (the rest of the film). Windows are picked one after another, each starting after the last one picked, and never on the breaker-block article's candles, so no two films share candles.
Use itPut the stop below the zone's bottom, and write down the close that cancels the idea.
Watch outA mitigation block ends like any zone: on a close. One that's been closed back through is finished.
Mitigation block vs order block
An order block is born at a break: the last opposite candle before a close beyond a swing. A mitigation block comes from a failure. The drop from the high broke nothing, so no order block formed on the way down, and the up candle at the high gets its name only when price closes back above it.
The same close above the high makes an order block too, by the order-block rule: the last down candle before that close. That's a different candle from the mitigation block, so one break can leave two zones.
Where the definitions differ
"Mitigation block" means at least four things on the pages that rank for it (checked 4 Oct 2026):
- A failed swing, then a structure shift. This page's reading. TradingFinder puts it the same way: "the market structure changes without sweeping the previous high/low". It draws the zone from the broken high down to the higher low, not one candle.
- A sweep makes it a breaker. TradingFinder's next line: "In Breaker Blocks, the price first sweeps the high/low and then changes the market structure." By wicks, the third film's case is a breaker. By closes, as here, it isn't.
- A retest of an old order block that held. innercircletrader.net: "an old order block that gets re-tested by price after the original move played out", traded as continuation. Our order block page calls that a first retest.
- A failed order block with no body close. ictkillzone.com: "Mitigation Block = trade failed, no body close, MSS confirmed."
- Where trapped traders get out. TradingEdge: "a zone where price returns to allow trapped large participants to exit at break-even". That's a reason it might work, not a rule you can draw.
"Mitigated" on its own usually means something else again. In SMC Basics, a zone is mitigated when a candle closes through its far edge. LuxAlgo's free Smart Money Concepts script removes an order block on "mitigation", by default when a wick trades beyond it (lines 103 and 487, source read 2026-10-03). Plenty of traders say mitigation for a first retest. None of those is this block.
We use the failed-swing reading because it can be computed from closes, it gives the block its own place next to the breaker, and it's the one the free script below draws.
How to spot a mitigation block, step by step
- Fix the timeframe, the swing length and close or wick before you look.
- Check the trend. For a bullish block, the last break was a close below a swing low.
- Mark the last swing low (the low to beat) and the lower high after it (the high to break).
- Watch the drop from the high. A close below the low means a breaker story: stop here. A wick alone doesn't count.
- Wait for a close above the high: a CHoCH.
- Mark the body of the last up candle at or before the high. That's the block.
- Watch the first retest from above. A close below the zone's bottom ends it.
Which timeframe works best?
We haven't compared timeframes, so we can't name a best one. The rule is the same on every chart. Pick the timeframe before you look, and read every swing and break on that timeframe's closes.
Common mistakes
- Calling every higher low a failed swing. In an uptrend, a higher low and then a break of the high is a BOS. The block needs a CHoCH.
- Counting a wick as a new low on one chart and not on the next. Decide close or wick in advance.
- Mixing it up with a breaker. Ask whether the drop closed below the low.
- Drawing it before the close above the high. Until then it's just a candle at a swing.
- Keeping it after a close through it. It's gone.
- Reading "mitigated" as "mitigation block". On most charts, mitigated means a zone was touched or closed through.
Do mitigation blocks work?
Which tools draw mitigation blocks?
None of ours. We read the Pine source of every free desk and every indicator we sell. SMC Basics and the SMC AI-Scored Toolkit (v1.4.2) draw order blocks and fair value gaps; neither draws or labels a mitigation block.
The break on your own chart, free. Signal Desk labels BOS and CHoCH on closed candles (View preset Pro), so it marks the close that completes a mitigation block. The rest you check by eye: was the last break against the block, did the drop stay above the last low, and which up candle sat at the high. Its default swing length is 5 candles a side; the films here use 3.
One free TradingView script we source-checked for our SMC indicator comparison does draw them, with its own rule (source read 2026-10-03):
- Market Structure Break & Order Block by EmreKb draws a block at each market structure break, a turn of its trend. For a bullish one it takes the last up candle at or before the previous swing high, high to low, and labels it Bu-MB, a mitigation block, when the newest low isn't below the one before, or Bu-BB, a breaker, when it is (line 152; Be-MB and Be-BB mirror it, line 159). Its swings are 9-bar zigzag points read from wicks, so a wick below the low counts as a lower low there, and a break needs a 0.33 Fibonacci margin rather than a close (lines 8, 10 and 109). On the same break it also draws Bu-OB: the last down candle between that high and the newest low.
Same name, different rules. Check which one a tool uses before you trust its boxes.
Disclosure
We build Signal Desk and SMC Basics and give both away; we sell other indicators, including the SMC AI-Scored Toolkit. We have no relationship with EmreKb, LuxAlgo, TradingFinder, innercircletrader.net, ictkillzone.com or TradingEdge. Nothing here is financial advice.
Use these animations on your site.