
Two traders had the same losing month — same market, same kind of system, same ugly drawdown.
One blew up the account.
The other was fine the next week.
The difference wasn't talent, and it wasn't discipline, and it wasn't that one of them had read more trading-psychology books and become emotionally bulletproof like some kind of candlestick monk.
The difference was one sentence, written before the pain: if this happens, I stop.
The trader who blew up didn't lack a strategy. He had rules for entries, exits, and position size; he could explain the setup clearly. What he didn't have was a rule for when to stop trading the system itself. So when the drawdown came, he made the most important decision of the month in the worst possible state — down, frustrated, slightly embarrassed, and absolutely convinced the next trade would fix it. The account didn't die from one bad setup. It died from "one more chance."
The other trader had a kill-switch. Not a feeling, not a motivational quote, not "I'll be disciplined this time" (which is just gambling wearing a blazer) — a rule. Hit this daily loss, stop for the day. Hit this drawdown, halt and review. See this structural decay, retire the system. When the pain came, there was nothing to debate; the calm version of him had already decided, and the losing version just had to obey.
That's this article. It's the final piece of the risk trilogy: first how much to risk per trade, then how bad a normal drawdown can get, and now the question almost nobody writes down — when do you actually stop? Because without that answer you'll do one of two things: panic-quit a healthy system at the bottom, or ride a dead one into the ground. The kill-switch is the line between those two deaths — and a kill-switch isn't pessimism, it's the thing that lets you believe in the strategy without becoming stupid about it.
Two requests before we start:
- Save this and write your three-tier stop sheet before your next session.
- Send it to the trader who keeps "giving it one more chance." That sentence has a body count.
a common daily loss-limit zone in prop-style risk frameworks — useful as an outer circuit breaker, not a target.
prop risk rules ↗where disciplined traders often stop relative to their official daily limit — before the revenge-trade zone begins.
daily loss-limit practice ↗a common long equity-curve moving average used as a system-health overlay — a review signal, not a magic verdict.
equity-curve trading ↗The one-sentence version
Most traders define the entry and almost nobody defines the stop for the system. They know exactly what makes them buy, where the trade's stop-loss goes, the indicator settings, the backtest profit factor to three decimals like it's their child's birthday. But ask them "what exact condition makes you stop trading this strategy?" and you get silence, then vibes: "I'll review it if it looks bad." "I'll stop if the drawdown gets too deep." "I'll know."
No, you won't. You will not "know" in the drawdown — you'll be tired, emotional, biased, and desperate for the next trade to make the pain go away, which is the worst possible version of you to hand a kill-switch to. The fix is to decide the stop rule before the pain starts: write it down, make it mechanical, make it boring, and make it impossible to renegotiate mid-drawdown. A kill-switch isn't weakness or "not believing in the strategy." It's what lets the calm version of you overrule the losing version — which is the only version that ever blows up an account.
I — Two ways to die without a stop rule
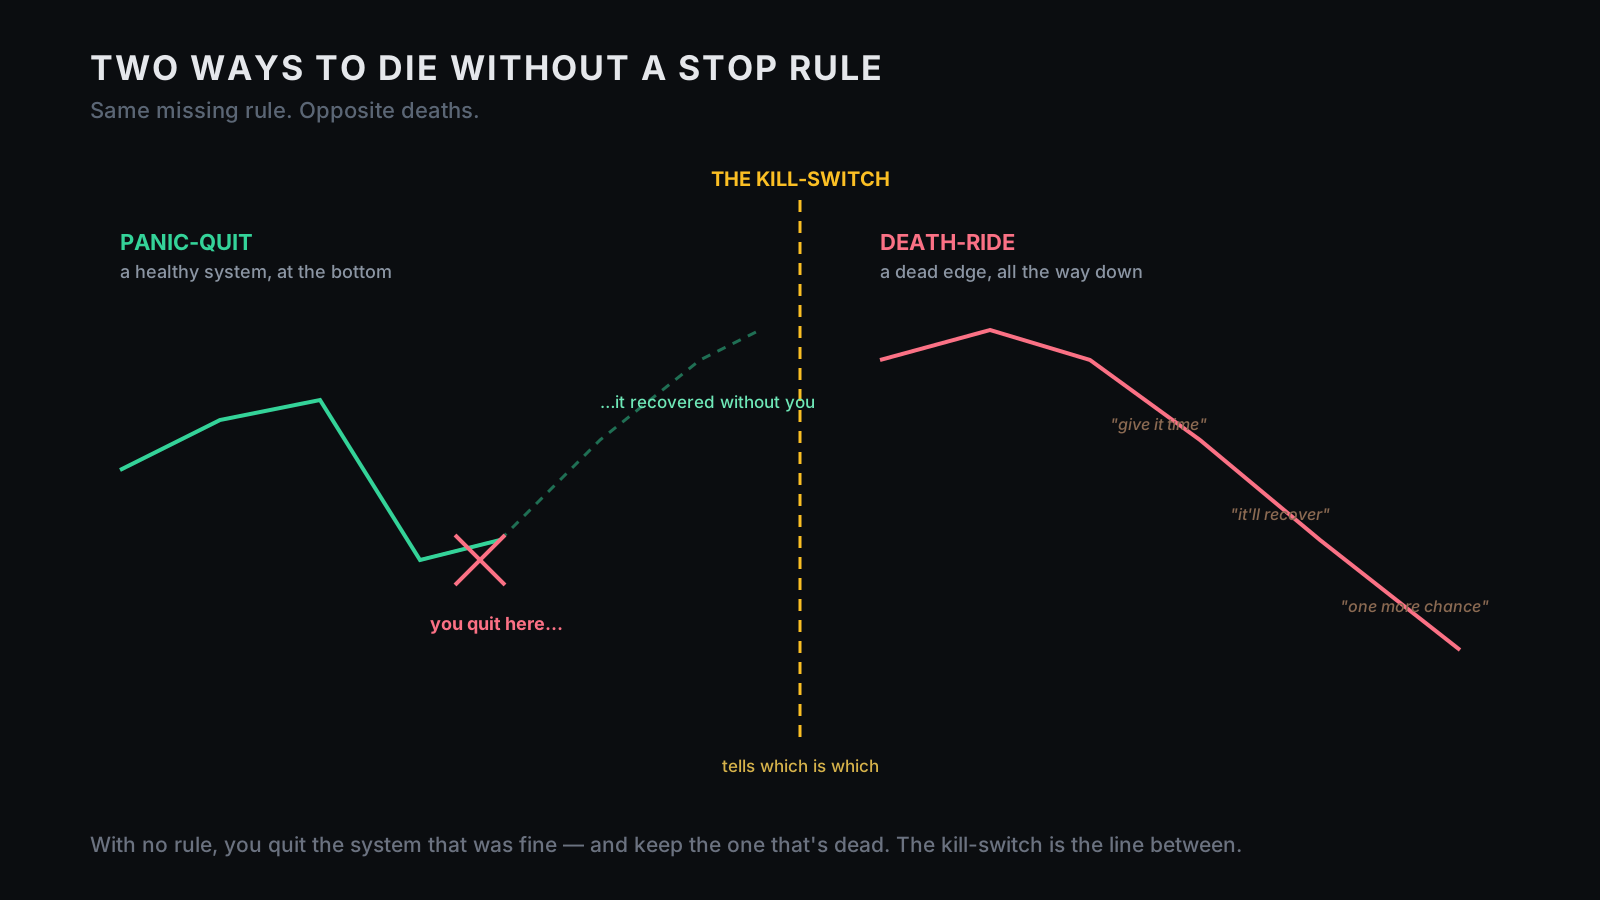
No stop rule creates two opposite disasters. The first is the panic-quit: a healthy system enters a normal drawdown, it hurts more than expected, you start checking settings and rereading the backtest and zooming into the last ten trades like a detective trying to solve a crime that probability committed — and you switch the system off, often near the bottom, often right before recovery. The system wasn't dead. Your expectations were.
The second is the death-ride, and it looks like loyalty. The system is genuinely decaying — the market changed, costs widened, the regime shifted, the thing you validated is no longer the thing you're trading — but with no stop rule, every loss becomes something to rationalize: "it's just variance," "give it time," "it recovered before." Now you're not trading a system; you're feeding a corpse.
The brutal part is that both mistakes feel identical in real time. A normal drawdown and a dead edge both look like equity going down, both feel bad, both make your brain start writing dramatic little novels. That's why "just hold through drawdowns" and "cut it when it hurts" are both incomplete on their own. The question was never "hold or stop?" It's "which kind of pain is this — healthy variance, or structural failure?" — and you can't answer that with emotion, you answer it with a rule.
II — You can't decide in the drawdown
The biggest lie in system trading is "I'll decide when it happens." You will decide — but you'll decide badly, because losses change the person making the decision. After a few losses your brain stops being a risk manager and becomes a hostage negotiator: "one more trade," "half size," "just this setup," "recover to breakeven, then stop." That's not analysis; that's the account trying to crawl out of pain, and the more you're down, the worse the decisions get.
So you write the stop rule at zero pain — before the session, before the system goes live, before the chart starts insulting your bloodline — not at −8%, not at −15%, not after the third losing trade when your inner gambler starts doing push-ups. Pilots don't decide the abort threshold during the emergency; factories don't debate the emergency stop while the machine is on fire. You write the threshold before the pain. The pain just triggers the rule. That's the whole architecture.
III — A drawdown is not a failure
This is where the trilogy connects. Position sizing said: don't be wrong too big. Monte Carlo said: a normal drawdown can be far worse than the single backtest showed. Put those together and you get the exact danger here — set your kill-switch too tight and you'll murder healthy systems; set it too loose and dead systems will drain you. That tension is the whole problem.
A drawdown isn't automatically a failure; it's the cost of finding out whether the system has an edge. Even good systems have losing streaks, even strong edges go flat, even robust EAs look stupid for a while. If your Monte Carlo said the system can normally draw down 24%, then a 20% drawdown isn't a crisis — it's the plan. Painful, yes; unexpected, no. But if the system pushes beyond its planned range, or starts behaving in ways your validation never allowed, that's different — and now you've stopped asking "does this hurt?" and started asking "is this still the system I tested?" Pain is not enough reason to stop, and confidence is not enough reason to continue. You need a boundary — and that boundary is the kill-switch.
IV — The three-tier kill-switch
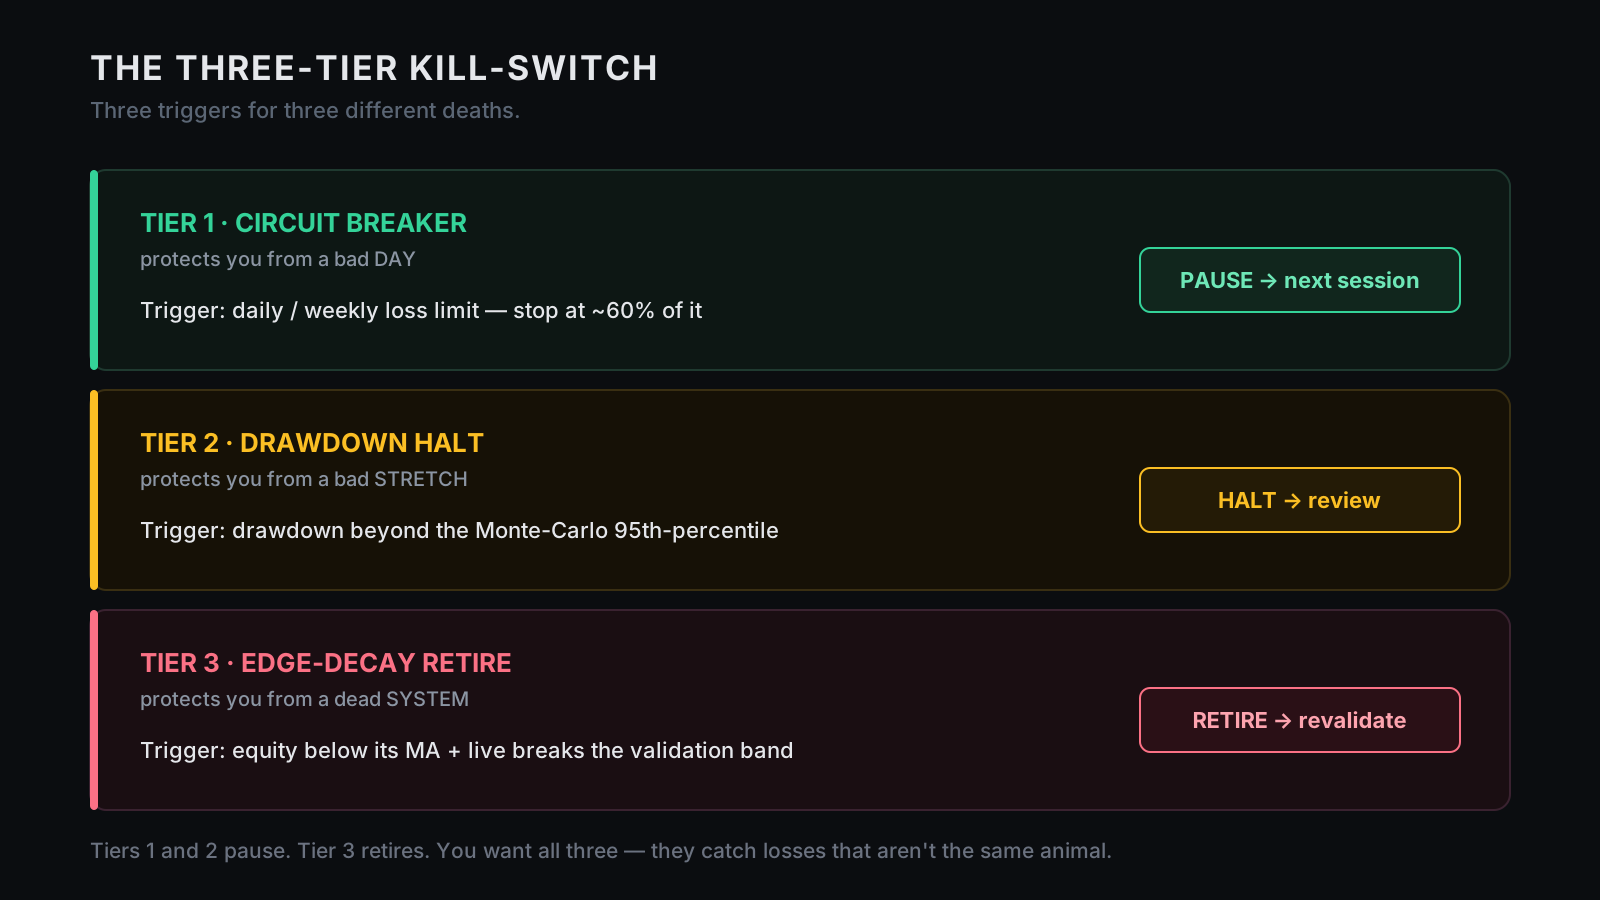
A good kill-switch has three tiers, because not all losses are the same animal. Tier 1 protects you from a bad day, Tier 2 from a bad stretch, Tier 3 from a dead system. You want all three.
Tier 1 · Circuit breaker (a bad day). This isn't about whether the strategy is broken — it's about whether you should be allowed to keep pressing buttons today. A hard daily limit: hit it and you stop, full stop — not reduce size, not "only A+ setups," not "one last trade if the candle closes clean." Daily loss limits exist because the worst damage usually comes after the first loss; the next few trades are where revenge trading shows up wearing your face. Prop-style frameworks often use daily limits around 4–5% as an outer boundary — but the smarter move is to stop before the wall, at 50–60% of it (a 5% limit → a 3% personal stop), because that last 40% is the "get it back" zone where the account quietly becomes a casino voucher.
TIER 1 — WHEN daily loss hits my personal stop (≈60% of the hard limit),
         THEN stop trading until the next session. No review. No drama.
Tier 2 · Drawdown kill (a bad stretch). A maximum-drawdown line that halts for review — not panic, review. And you don't set it from feelings; you set it from the Monte Carlo drawdown distribution:
Backtest max DD:               12%
Monte-Carlo 95th-percentile:   24%   ← bad-but-normal. You HOLD here.
TIER 2 halt line:              32%   ← beyond normal. HALT + REVIEW.
The 24% isn't a stop, it's the expected pain zone; a line clearly beyond it is your signal that you've left the normal range. The action is halt + review — check execution, spreads, slippage, trade frequency, whether the live distribution still matches the tested one, whether the regime is inside your validation sample — not "retire," and definitely not "double size because drawdown discount." A deep-but-normal drawdown doesn't trip Tier 2. An abnormal one does. That's the entire job.
Tier 3 · Edge-decay retire (a dead system). The slow one — Tiers 1 and 2 pause, Tier 3 retires. It's harder to trigger, because pulling a system is serious, but it has to exist, because edges decay. It's based on structural evidence, not pain:
TIER 3 — WHEN the equity curve stays below its long moving average,
         AND live expectancy breaks the validation band,
         AND trade behaviour no longer matches the tested profile,
         THEN retire the system until it re-passes validation.
Note the and. Not one bad week, not one ugly trade, not a vibe — a structural break. Tier 3 is where you stop feeding the corpse.
V — Telling variance from broken
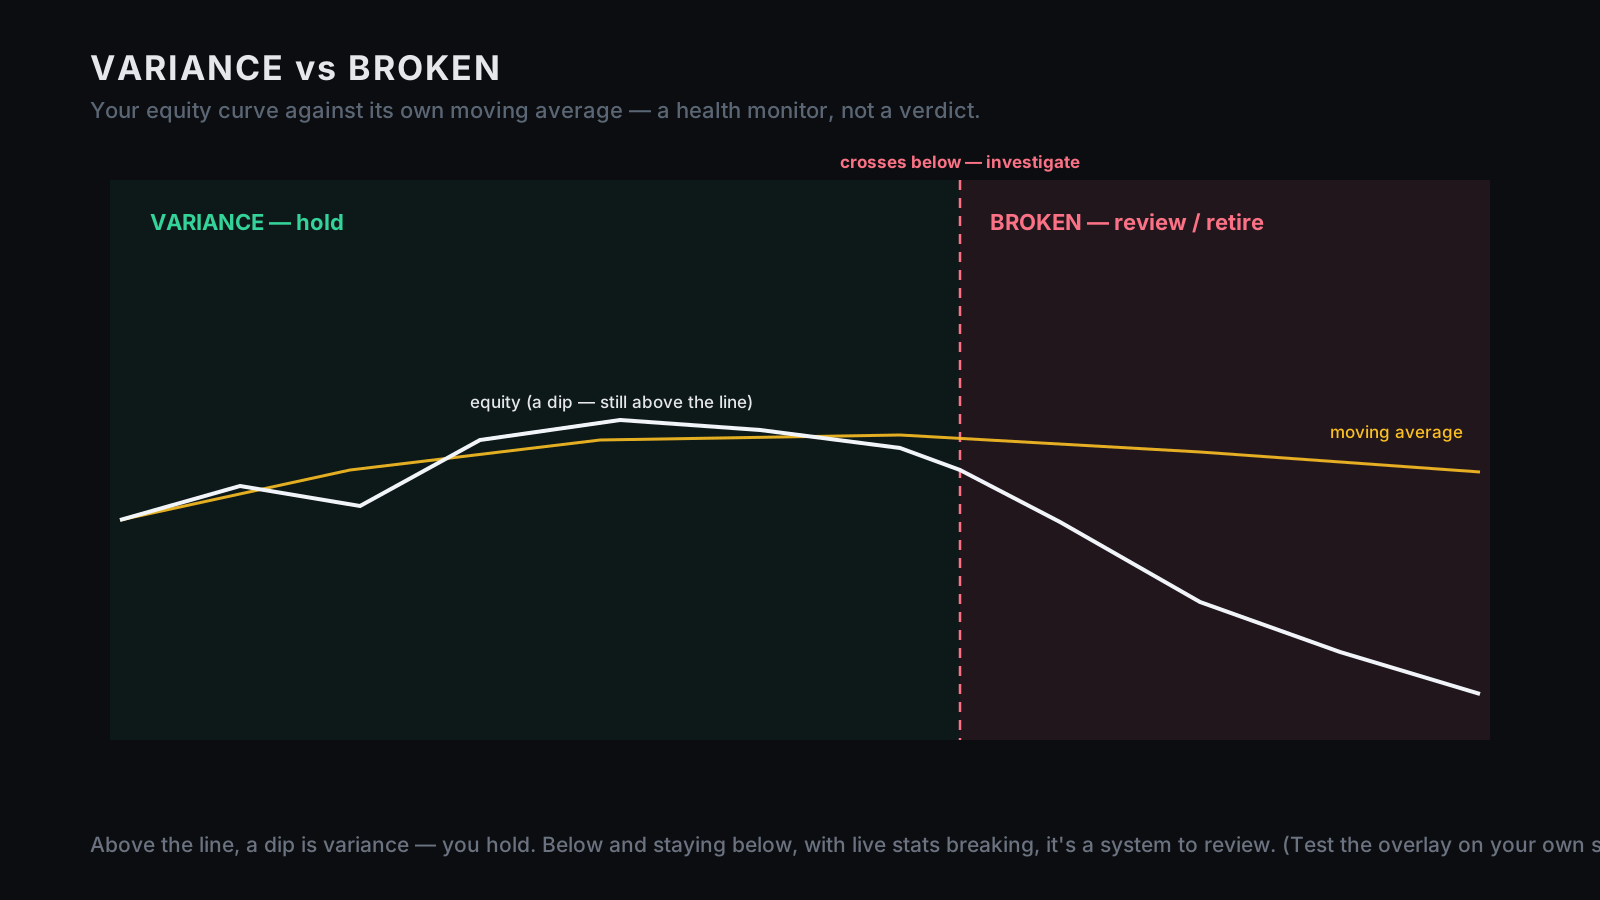
Here's the top-quant trick, made simple: treat your equity curve like its own market — not with money, with attention. The curve isn't just a pretty line in the report; it's the strategy's vital sign, and one clean overlay is a moving average on it:
Equity above its long MA                         →  GREEN   (keep trading)
Equity below its short MA                         →  PAUSE   (stop new risk, review)
Equity below long MA + live stats break the band  →  RETIRE  (revalidate before reuse)
The 200-day moving average is a common long-term lens; a 20- or 50-day version is a faster warning. But — and this is what separates a real quant from a TikTok one in a backwards cap — don't turn this into religion. The moving average is a health monitor, not a magic judge. Some systems recover strongly after equity dips; some roll into worse ones; some have negative autocorrelation where weakness precedes strength, others positive autocorrelation where weakness breeds weakness. So you test the overlay on your own system before trusting it live. The amateur rule is "equity below the 200-day means dead." The professional rule is "equity below its health threshold means the system needs a different decision state." Variance is pain inside the expected range; broken is behaviour outside the validated range. They feel identical — they don't measure identical, which is exactly why you measure instead of feel.
VI — The re-entry rule
Almost everyone who writes a stop rule forgets the other half: how do you turn it back on? Skip it and you get two new failures. One — you stop correctly but never restart: a Tier-1 daily stop becomes a permanent fear scar, the system was fine, the day was bad, but with no re-entry rule you stay frozen. Two — you restart too fast: you hit a drawdown halt, get bored two sessions later, and flip it back on because the market "looks better," which isn't re-entry, it's vibes with a keyboard.
Every tier needs a return path. Tier 1: resume next session — the cool-off was the rule, so the green light is automatic once the clock resets. Tier 2: resume only after the review clears execution, costs, regime, and behaviour; you don't need the system to make money again first, you need evidence nothing structural broke. Tier 3: no automatic restart — the system must re-pass out-of-sample validation like a brand-new strategy, with fresh testing, updated costs, locked parameters, and forward monitoring. No secret "I still believe in it" button. A stop rule without re-entry is incomplete; a re-entry rule without revalidation is dangerous. Together they let you pause without panicking and retire without denial.
VII — Write the stop sheet
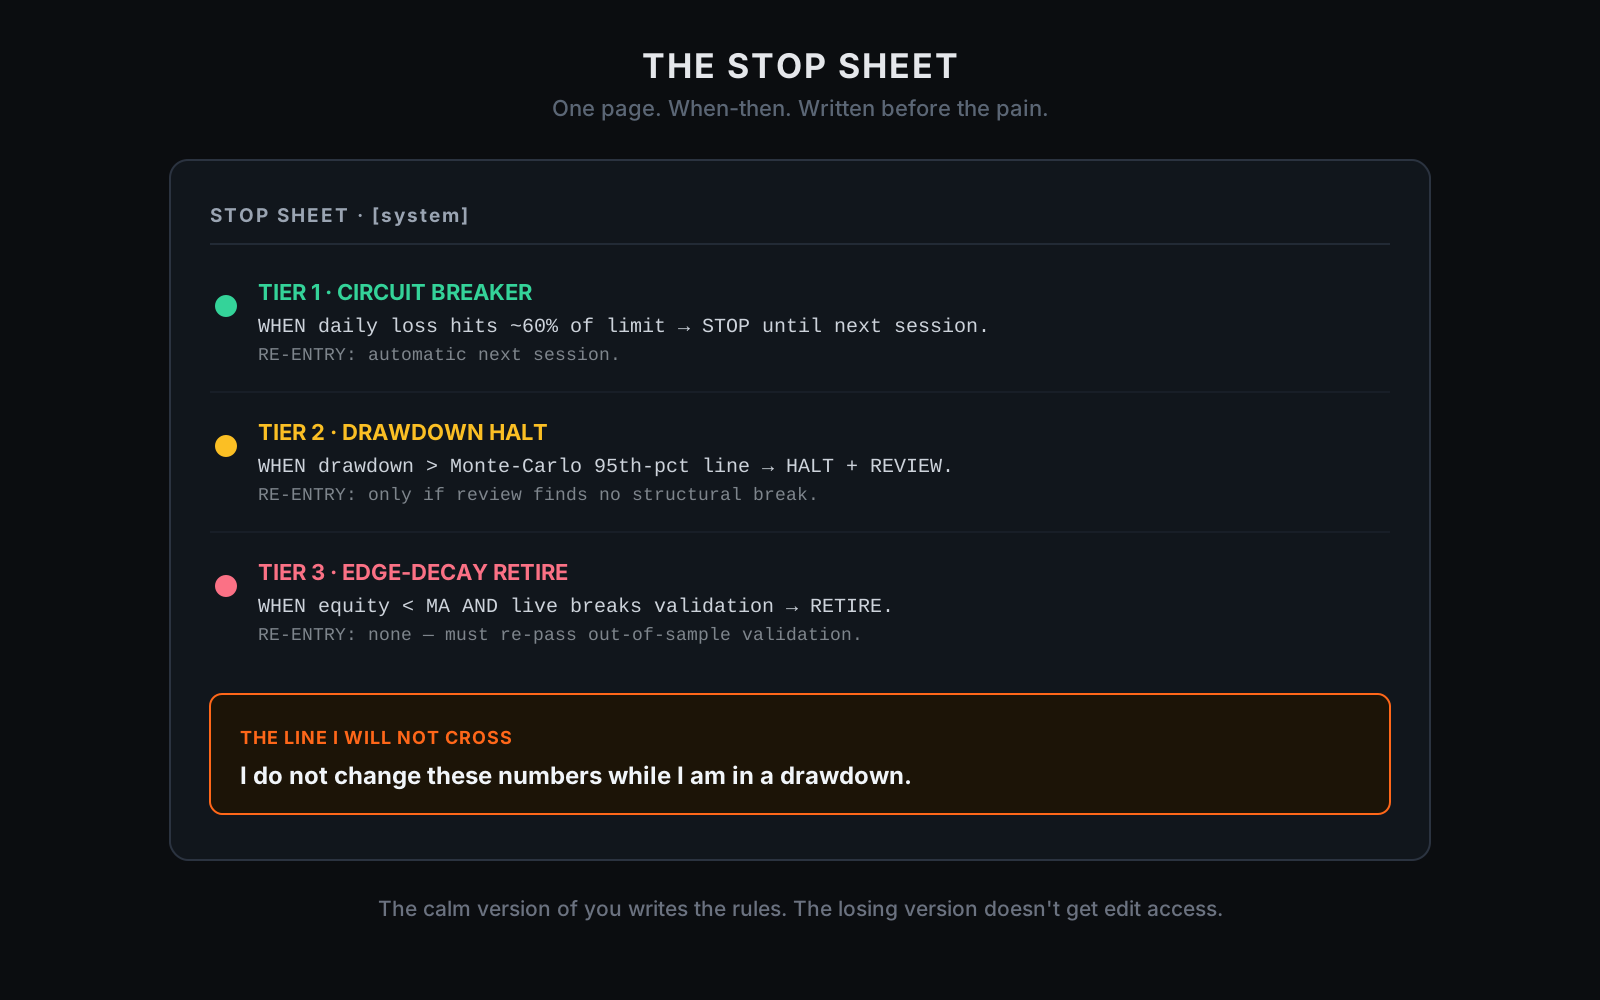
All of this fits on one page — not a 40-page risk document nobody reads, one page, written like a machine in when-then statements with your numbers, not a guru's round ones:
STOP SHEET — [system name]

TIER 1 · CIRCUIT BREAKER  (a bad day)
  WHEN daily loss hits 3% (≈60% of my 5% limit)  → stop until next session.
  WHEN weekly loss hits 6%                        → stop until next week.
  RE-ENTRY: resume automatically next session / next week.

TIER 2 · DRAWDOWN HALT  (a bad stretch)
  Monte-Carlo 95th-percentile DD: 24%  (expected — I hold).
  WHEN total drawdown exceeds 32%                 → HALT + REVIEW.
  REVIEW: execution · spread/slippage · frequency · regime ·
          live expectancy vs backtest · loss clustering vs Monte Carlo.
  RE-ENTRY: only if review finds no structural break.

TIER 3 · EDGE-DECAY RETIRE  (a dead system)
  WHEN equity stays below its long MA, AND live expectancy breaks the
       validation band, AND behaviour no longer matches the tested profile
       → RETIRE.
  RE-ENTRY: none automatic. Must re-pass out-of-sample validation from scratch.

THE LINE I WILL NOT CROSS:
  I do not change these numbers while I am in a drawdown.
That last line is the whole machine. The losing version of you will try to renegotiate — the stop's too tight, then too loose, the system deserves one more chance, then maybe just change the settings, then maybe add one filter, then maybe double the lot to recover faster. The calm version of you wrote the rules. The losing version does not get edit access. And you can have AI build the monitor that watches them, so the decision is a status on a screen instead of a knot in your stomach:
Build me a kill-switch monitor for my trading system.
Inputs: trade-by-trade equity curve, daily & weekly P&L, peak balance,
my Monte-Carlo 95th-percentile drawdown, my Tier-2 halt line, an
equity-curve moving-average length, and my live-expectancy band.
Output one status — GREEN / PAUSE / REVIEW / RETIRE — plus current
drawdown, distance to each threshold, whether re-entry is allowed, and
the checklist I must clear before restarting. Keep it simple enough to
check before every session.
That's the same build-it-yourself workflow, pointed at the rule that decides when to stop — not predicting the market, just turning your written stop sheet into a dashboard you can't pretend you didn't see.
The 5-minute version
Write this now, for the system you actually trade — it's the stop sheet, filled in.
Minute 1 · Tier 1 (your day). Pick a daily loss limit you can take routinely, set your real stop at 50–60% of it, add a weekly limit, and write "resume next session."
Minute 2 · Tier 2 (your stretch). Take your 95th-percentile drawdown from Monte Carlo (or 1.5× your worst backtest drawdown if you haven't run it), set the halt line a clear step beyond it, and write "halt + review."
Minute 3 · Tier 3 (your system). Define the structural decay signal — equity below its long MA and live expectancy outside the validation band and behaviour mismatch — and write "retire; must revalidate."
Minute 4 · Re-entry. Write the way back on for each tier, so a stop never silently becomes a permanent quit or an instant restart.
Minute 5 · The line. Write, by hand: "I will not change these rules while I'm in a drawdown." Put it where your losing self has to look at it — that person is very persuasive, so don't give them admin rights.
Where this meets ProEA
This is why a serious automated system needs visible halt logic — not hidden, not implied, not buried under a "smart recovery" feature that quietly removes the brakes. The most important code in a trading system often isn't the entry; it's the part that decides when not to trade: the daily-loss halt, the spread halt, the drawdown halt, the kill-switch, the re-entry condition. Those aren't accessories. They're the brakes.
MTR ships as full MT5 source so that layer can be read: you can see how risk is controlled, set the thresholds to your own numbers, and decide whether the system's stop logic matches your tolerance before it's live. That's the honest version of automation — not "trust the black box," but "here are the brakes; read them, set them, test them." A system you can't switch off on your own terms isn't automated — it's unsupervised, and unsupervised risk eventually gets very creative. The caveat, plainly: a kill-switch doesn't create an edge or guarantee a profit — a perfectly disciplined stop on a losing system still loses, just slower and with less damage. It's proof of method, not proof of profit. MTR can lose like anything else; it just shouldn't be able to lose in a way you never defined a stop for.
Disclosure
We sell source and evidence you can inspect — not outcomes, not guarantees. Stop rules, circuit breakers, drawdown halts, and kill-switches reduce the size and emotional cost of losses; they do not remove the risk of loss, predict the future, or turn a negative-expectancy system positive. A disciplined stop can still halt a system that later recovers; a loose one can still allow damage. Every threshold must be tested against your specific strategy, market, costs, and tolerance. Trading is risky, leverage magnifies it, and past performance is not future performance.
Your first 20 minutes
Don't take our word for it — go define the stop.
Minutes 0–5 · Find the halt logic. Open MTR's source and locate the part that stops trading — daily loss, spread, drawdown, the kill-switch. If you can't find a defined stop in a system, that itself is information.
Minutes 5–10 · Set your three tiers. Put your numbers on Tier 1, Tier 2, and Tier 3 — your account, your Monte Carlo, your tolerance — not someone else's because they sound clean.
Minutes 10–15 · Build the monitor. Use the AI prompt above to turn the stop sheet into a single GREEN / PAUSE / REVIEW / RETIRE status. If it needs a philosopher to interpret, simplify it.
Minutes 15–20 · Write the line. Commit, in writing, to not changing the numbers mid-drawdown — then save the stop sheet where your future self has to read it. It's now part of the system, not a decoration.
One last thing
A strategy is a plan for getting in. A stop rule is a plan for what happens when the plan starts hurting. Most traders have the first and almost nobody has the second — which is why they either quit too early or stay too long. Panic and denial look like opposites; they're twins, and both are born from undefined rules.
So define the rules. Size it so a loss can't ruin you, simulate it so a normal drawdown can't surprise you, and stop it so a dead edge can't bleed you. That's the trilogy — not motivation, not discipline cosplay, a system. And the whole thing starts with one sentence, written before the pain: if this happens, I stop.